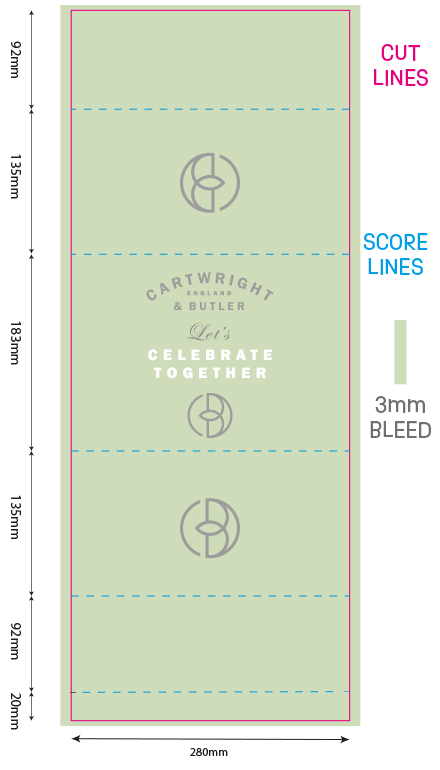
Artwork Setup Guide
If you’re looking at designing your own box sleeves, our handy artwork guide is here to help! Follow our step by step guide to perfect, print-ready results.
Our design team are familiar with most desktop publishing programs, if you need help or advice on creating your artwork, please call us and we will be happy to help.
** If ordering more than one version please upload a ZIP file containing all files or a multipage PDF file **
Proofing
We assume that the files you send us have been proofed by you and are ready for printing. This means you have checked the document for all spelling and grammatical errors, colour issues, layout and design BEFORE sending us your artwork. With this in mind you will not need to receive any further proofs from us. Although we will do our best to ensure that the files you send us are set up correctly, if you follow the guidance you should not have any issues.

Step 1. Send us your box, we will create an exact size template here. We will share the template with you so you can add your custom artwork.
Make sure to have a peek at our Design Tips if you’re struggling for artwork ideas, or take a look at our in-house Design Service if you’d prefer a professional touch.
Step 2. Once you start designing, remember all 4 panels of your box sleeve. You can have duplicate designs or a different design per panel – it’s up to you – but remember to create all the different designs that you will be using on your finished product.
Bear in mind that the folds will cause edges of your design to bend – so we wouldn’t recommend putting any crucial text by a fold line.
Step 3. Make sure your resolution is set to 300dpi to avoid low-quality pixelated prints. Ensure any images that you include are high resolution too, for the same reason!
Step 4. Include a 3mm bleed area on all sides of your design. This will ensure the safety of your design when printing. Make sure no crucial bits of text or images are over this line.
Step 5. If you use design software, make sure to set it CMYK mode, not RGB, to ensure the highest quality colour prints.
Step 6. Embed or outline fonts, to make sure they don’t accidentally revert to the default or original font.
Step 7. Consider using crop marks to mark out the safety zone – just for that added bit of reassurance!
Step 8. Save as a high-resolution, non-editable PDF and then upload or send! If the file is too large or you’re having difficulties, you can send via Dropbox, WeTransfer, Google Drive or other file sharing sites.